Vite 使用,及源码走读

最近参与了好几个前端项目,其中两个是公司内部的后台办公应用,第三个是公司内部的技术博客,都是基于 Vite/Vue/TS 的技术选型. 因此抽空整理一篇关于 Vite 打包工具的文章.
1. 特性
- 在开发时
- 在生产时,调用 rollup 并配合本身 vite 自身的拓展 Plugin 协议进行构建
- 配置更加轻量,口号是
zero configuration
2. 用例
2.1 创建工程
执行以下命令并自动创建, 也可以直接参考 StackBliz 中的现有模版. 比如说 vue-ts 🦄️
npm create vite@latest
2.2 核心指令
- vite (开发服务器)
- vite build(构建)
- vite optimize (预构建依赖)
2.3 TS 支持
只支持 Transpile,对与 type check 使用 IDE 现有能力. 需要特别关注以下配置:
- isolateModules
- useDefineForClassFields
- 对于游览器模式,编译选项设置为”vite/client”, 默认为 node
2.4 CSS 支持
支持各类 css 模块化的方案,比如 CSS Modules, 以及各种 CSS Pre-processors (sass/less/stylus) 链接参考这里
2.5 公共资源
服务时引入一个静态资源会返回解析后的公共路径:
import imgUrl from './img.png';
document.getElementById('hero-img').src = imgUrl;
等同于使用 import.meta 特性:
const imgUrl = new URL('./img.png', import.meta.url).href
document.getElementById('hero-img').src = imgUrl
2.6 插件
按照官方介绍中的描述与 WebPack 类似, 也支持在编译以及 Serve 的过程中使用插件. Vite 中的插件使用了 RollUp Plugin 模型. 详细的 Plugin 特性在 Plugin API 中阐述说明, 也可以基于此文档创建新的 Plugin。关于 Hook: 分为 universal hooks 以及 vite specific hooks, 采用 universal hook 的 plugin 可以作为通用的 rollup plugin 使用.而采用 vite specific hooks 的 plugin 只能作为 vite plugin.
插件默认在 Serve/Build 流程中都会执行,可以声明 apply: ‘build/serve’ 来设定 plugin 使用的场景
一些 Plugin 使用的例子
- 例子 1: 使用 transform hook 对特定符合特定 fileRegex 后缀的文件, 然后生成 js 文件
- 例子 2: 支持自定义 virtual module (使用 resolveId/load 函数)
通用勾子
在构建开始的时候调用一次:
- options
- buildStart
在每个请求/解析每个 module 的时候:
- resolveId
- load
- transform
- buildEnd
- closeBundle
Vite 勾子
- config
- configResolved
- configureServer (dev server 插入请求中间件)
- transformIndexHtml (在将 entry html point 文件转换为最终格产物时进行调用,可以替换整个 transformedHtml, 或者在)
执行顺序
Alias
User plugins with enforce: 'pre'
Vite core plugins
User plugins without enforce value
Vite build plugins
User plugins with enforce: 'post'
Vite post build plugins (minify, manifest, reporting)
2.7 关于 Rollup
接下来着重介绍一下 RollUp Plugin 的使用方式, 组件由属性以及 Hook 组成,属性其实就是名称以及版本。不同的 Plugin 可以声明当前 RollUp 提供的 hook 接口. 来自不同的 Plugin 提供的同样的 hook 函数被编排在一起,通过该 hook 自身宣称的调用属性来进行执行:
- async: 当前 Hook 可选择提供异步调用
- sequential: 当前 Hook 只能线性调用
- parallel: 当前 Hook 会被并发执行
- first: 在 Hook 队列中的 hook 返回结果不为 null 或者 undefined 时进行 sequential 执行,之后进行 parallel 执行.
Build Hooks 调用流程一览, 这里先看 Build Hook。Generate Hooks 可以举一反三:

当 Rollup 中的 plugin hook 声明了 Sequential / Parallel 时,Sequential / Parallel 可以进一步被编排, 参考 Vite pluginContainer 中的 hookParallel 函数实现:
// parallel, ignores returns
async function hookParallel<H extends AsyncPluginHooks & ParallelPluginHooks>(
  hookName: H,
  context: (plugin: Plugin) => ThisType<FunctionPluginHooks[H]>,
  args: (plugin: Plugin) => Parameters<FunctionPluginHooks[H]>,
): Promise<void> {
  const parallelPromises: Promise<unknown>[] = []
    for (const plugin of getSortedPlugins(hookName)) {
      // Don't throw here if closed, so buildEnd and closeBundle hooks can finish running
      const hook = plugin[hookName]
      if (!hook) continue

      const handler: Function = getHookHandler(hook)
      if ((hook as { sequential?: boolean }).sequential) {
        await Promise.all(parallelPromises)
        parallelPromises.length = 0
        await handler.apply(context(plugin), args(plugin))
      } else {
        parallelPromises.push(handler.apply(context(plugin), args(plugin)))
      }
  }
  await Promise.all(parallelPromises)
}
假设对于一个 hook 有 A(s), B (p), C(p), D(s) 的 Plugin 声明,s 代表 sequential/p 代表 parallel。那么如上 Plugin 中 hook 的执行顺序为:
[A] -> [B & C] -> [D]
2.8 SSR 支持
Vite 支持以中间件的形式在服务器请求 html 模版时,生成 Dom 并插入回模版中
import fs from 'node:fs';
import path from 'node:path';
import { fileURLToPath } from 'node:url';
import express from 'express';
import { createServer as createViteServer } from 'vite';

const __dirname = path.dirname(fileURLToPath(import.meta.url));

async function createServer() {
	const app = express();

	// 以中间件模式创建 Vite 应用,并将 appType 配置为 'custom'
	// 这将禁用 Vite 自身的 HTML 服务逻辑
	// 并让上级服务器接管控制
	const vite = await createViteServer({
		server: { middlewareMode: true },
		appType: 'custom'
	});

	// 使用 vite 的 Connect 实例作为中间件
	// 如果你使用了自己的 express 路由(express.Router()),你应该使用 router.use
	// 当服务器重启(例如用户修改了 vite.config.js 后),
	// `vite.middlewares` 仍将保持相同的引用
	// (带有 Vite 和插件注入的新的内部中间件堆栈)。
	// 即使在重新启动后,以下内容仍然有效。
	app.use(vite.middlewares);

	app.use('*', async (req, res) => {
		// 服务 index.html - 下面我们来处理这个问题
		const url = req.originalUrl;

		try {
			// 1. 读取 index.html
			let template = fs.readFileSync(
				path.resolve(__dirname, 'index.html'),
				'utf-8'
			);

			// 2. 应用 Vite HTML 转换。这将会注入 Vite HMR 客户端,
			//    同时也会从 Vite 插件应用 HTML 转换。
			//    例如:@vitejs/plugin-react 中的 global preambles
			template = await vite.transformIndexHtml(url, template);

			// 3. 加载服务器入口。vite.ssrLoadModule 将自动转换
			//    你的 ESM 源码使之可以在 Node.js 中运行!无需打包
			//    并提供类似 HMR 的根据情况随时失效。
			const { render } = await vite.ssrLoadModule('/src/entry-server.js');

			// 4. 渲染应用的 HTML。这假设 entry-server.js 导出的 `render`
			//    函数调用了适当的 SSR 框架 API。
			//    例如 ReactDOMServer.renderToString()
			const appHtml = await render(url);

			// 5. 注入渲染后的应用程序 HTML 到模板中。
			const html = template.replace(`<!--ssr-outlet-->`, appHtml);

			// 6. 返回渲染后的 HTML。
			res.status(200).set({ 'Content-Type': 'text/html' }).end(html);
		} catch (e) {
			// 如果捕获到了一个错误,让 Vite 来修复该堆栈,这样它就可以映射回
			// 你的实际源码中。
			vite.ssrFixStacktrace(e);
			next(e);
		}
	});

	app.listen(5173);
}

createServer();
3. 源码走读
3.1 代码配置
- 下载 Vite 源码并切出版本 5.2.8
- 使用 create-vite 工具快速搭建 vite-ts 模版工程 npm install -g create-vite
- 在 Vite 工程目录完成安装后,开启监听模式 npm run dev.
- 在 Vite demo 工程中设置 file 路径的依赖,指向 /vite-src/packages/vite
"devDependencies": {
	"@vitejs/plugin-vue": "^5.0.5",
	"typescript": "^5.2.2",
	"vite": "file:../vite-src/packages/vite",
	"vue-tsc": "^2.0.24"
}
3.2 项目结构
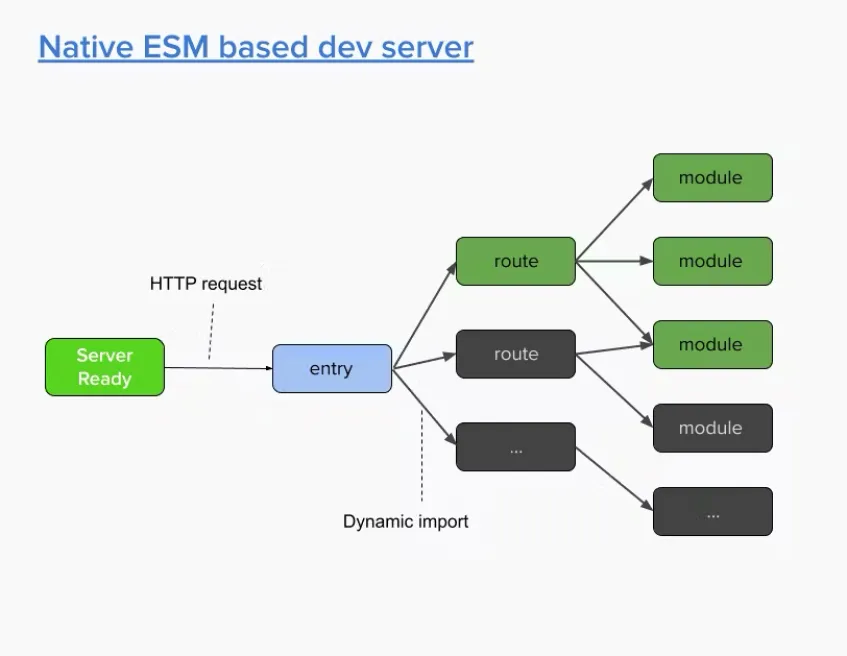
Vite 源码库文件路径组成参考下图,可以通过 vite dev 这个指令来了解整个 Vite 在开发时的运行特点. (详情参考 3.3)
.
|   // 游览器页面中插入的HMR相关执行代码,
|   // 会启动WebSocket 并与node/server 进行交互
├── client
│   ├── client.ts
│   ├── env.ts
│   ├── overlay.ts
│   └── tsconfig.json
|
├── node
│   ├── // build指令实现
│   ├── build.ts
│   ├── // 总命令指令实现
│   ├── cli.ts
│   ├── ....
│   ├── optimizer
│   │   ├── esbuildDepPlugin.ts
│   │   ├── index.ts
│   │   ├── optimizer.ts
│   │   ├── resolve.ts
│   │   └── scan.ts
│   │
│   │		// 编译以及开发服务器模式下共享的所有插件
│   ├── plugins
│   │   ├── asset.ts
│   │   ├── assetImportMetaUrl.ts
│   │   ├── clientInjections.ts
│   │   ├── completeSystemWrap.ts
│   │   ├── css.ts
│   │   ├── dataUri.ts
│   │   ├── define.ts
│   │   ├── dynamicImportVars.ts
│   │   ├── esbuild.ts
│   │   ├── html.ts
│   │   ├── importAnalysis.ts
│   │   ├── ......
│   │   ├── wasm.ts
│   │   ├── worker.ts
│   │   └── workerImportMetaUrl.ts
│   │
│   │   // 开发模式下服务器相关代码, 以及中间件
│   ├── server
│   │   ├── hmr.ts
│   │   ├── index.ts
│   │   ├── middlewares
│   │   ├── moduleGraph.ts
│   │   ├── ......
│   │   ├── transformRequest.ts
│   │   ├── warmup.ts
│   │   └── ws.ts
│   │
│   │   // Vite SSR: https://vitejs.dev/guide/ssr.html
│   ├── ssr
│   │   └── ....
│   │
│   ├── tsconfig.json
│   ├── utils
│   │   └── logger.ts
│   ├── utils.ts
│   └── watch.ts
│
│   // Vite Runtime API: https://vitejs.dev/guide/api-vite-runtime
├── runtime
│   └── ....
│
|		// 被SSR/Cient 等共享的代码,比如说HMRContext
├── shared
│   ├── constants.ts
│   ├── hmr.ts
│   ├── ssrTransform.ts
│   ├── tsconfig.json
│   └── utils.ts
│
│   // 三方库类型声明d.ts补全, e.g. chokidar
└── types
    ├── chokidar.d.ts
    ├── .....
    └── ws.d.ts
3.3 启动流程
从 npm package.json 的 bin 声明不难看出,发布包的执行入口文件位于: vite/bin/vite.js 并进一步调用 ../dist/node/cli.js. /node/cli.js dev 流程启动的 code snippet:
/*
source code:
vite/src/node/cli.ts
*/

cli
	.command('[root]', 'start dev server') // default command
	.alias('serve') // the command is called 'serve' in Vite's API
	.alias('dev') // alias to align with the script name
	.option('--host [host]', `[string] specify hostname`, { type: [convertHost] })
	.option('--port <port>', `[number] specify port`)
	.option('--open [path]', `[boolean | string] open browser on startup`)
	.option('--cors', `[boolean] enable CORS`)
	.option('--strictPort', `[boolean] exit if specified port is already in use`)
	.option(
		'--force',
		`[boolean] force the optimizer to ignore the cache and re-bundle`
	)
	.action(async (root: string, options: ServerOptions & GlobalCLIOptions) => {
		filterDuplicateOptions(options);
		// output structure is preserved even after bundling so require()
		// is ok here
		const { createServer } = await import('./server');
		try {
			const server = await createServer({
				root,
				base: options.base,
				mode: options.mode,
				configFile: options.config,
				logLevel: options.logLevel,
				clearScreen: options.clearScreen,
				optimizeDeps: { force: options.force },
				server: cleanOptions(options)
			});

			if (!server.httpServer) {
				throw new Error('HTTP server not available');
			}

			await server.listen();

			const info = server.config.logger.info;

			// Profiler 服务管理以及快捷键绑定
		} catch (e) {
			const logger = createLogger(options.logLevel);
			logger.error(colors.red(`error when starting dev server:\n${e.stack}`), {
				error: e
			});
			stopProfiler(logger.info);
			process.exit(1);
		}
	});
上述代码 21 行调用的 createServer 封装了服务器的主要启动逻辑
- 将命令行传入的配置以及 vite.config.js 中的配置进行合并, 供各个功能点使用
- 创建公共资源托管目录, 并配置对应的中间件进行处理, 详情参考 servePublicMiddleWare
- 创建 HttpServer 以及进一步基于 HttpServer 创建 WebSocketServer
- 使用 Chokidar 创建当前的开发工程监听路径, 在路径发生变更时会执行 pluginContainer 相关的插件,并触发 HMRUpdate
/*
source code:
vite/src/node/server/index.ts
*/

const onHMRUpdate = async (
	type: 'create' | 'delete' | 'update',
	file: string
) => {
	if (serverConfig.hmr !== false) {
		try {
			await handleHMRUpdate(type, file, server);
		} catch (err) {
			hot.send({
				type: 'error',
				err: prepareError(err)
			});
		}
	}
};

watcher.on('change', async (file) => {
	file = normalizePath(file);
	await container.watchChange(file, { event: 'update' });
	// invalidate module graph cache on file change
	moduleGraph.onFileChange(file);
	await onHMRUpdate('update', file);
});
- 生成 ModuleGraph Instance 用来管理 ModuleNode, ModuleGraph 在以下函数的相关调用场景中被更新(只关注 dev 模式下的引用场景)
- ensureEntryFromUrl
- indexHtml 中间件 -服务器加载 .html 时,对 js/css module 进行扫描 -dev server 首次打开页面时,打开默认 index .html 文件, 对 js/css module 进行扫描
- css plugin: -处理 CSS 文件中的 import
- updateModuleInfo
- importAnalysis plugin -处理 js/ts 文件相关的 transform 操作时,扫描对应的 Module 信息
- invalidateModule
- HMR 发生时,清理特定 module 文件缓存
- Chokidar File Watcher 提示文件发生变更时,清理特定 module 文件缓存 -生成 PluginContainer 用来提供插件查询/执行相关的逻辑(只关注 dev 模式下的引用场景)
- transform
- 在 indexHtml 中间件中,对 html 中的所有 module 进行 plugin transform 操作
- 在 transform 中间件中,对所有的 JS/ImportRequest/CSSRequest/Html 进行 transform 操作
- resolve
- importAnalysis plugin -处理 js/ts 相关的导入,根据 url 生成对应的 moduleId
- load
- 在 transform 中间件中,调用所有插件的 load 钩子 -注册各类中间件,诸如上文中提到的 servePublicMiddleWare, transformMiddleware 等等
- ensureEntryFromUrl
3.4 HMR 流程摘要
- 执行指令 npx vite dev
- 参考 3.3 启动流程细节,初始化开发服务器
- 完成服务器初始化后等待 index 页面唤起
- index 页面唤起后,等待 index 相关的资源通过 import / 等方式加载:
- 对与每一个 link 中的 style 以及 css 资源,由 indexHtml/transform 等服务器中间件处理,进一步通过 PluginContainer 调用所有注册插件的 transform 钩子, 对 HMR 来说,需要详细挖掘的莫过于 transform 过程中所使用的 importAnalysis 钩子
- 关于 importAnalysis, 首先对于 css/js 文件都会自动在文件头部插入以下代码
import { createHotContext as __vite__createHotContext } from '/@vite/client';
import.meta.hot = __vite__createHotContext('/src/style.css');
- 对于 css 文件,会进一步通过 css 专属插件在 transform 钩子中添加以下逻辑:
- 相当于把真实有效的样式表通过 viteupdateStyle 注入到正确元素的样式中
- 进一步标注 import.meta.hot.accept() 表示该模块的更新只会影响到它自己; 详细的 accept 函数出入参说明
- 进一步标注 import.meta.hot.prune() 表示该模块接受到 prune 指令时,需要进行的操作
import {
	updateStyle as __vite__updateStyle,
	removeStyle as __vite__removeStyle
} from '/@vite/client';
const __vite__id =
	'/Users/samuelzhaoy/Private/projects/vite/demo/src/style.css';
const __vite__css =
	':root {\n  font-family: Inter, system-ui, Avenir, Helvetica, Arial, sans-serif;\n  line-height: 1.5;\n  font-weight: 400;\n\n  color-scheme: light dark;\n  color: rgba(255, 255, 255, 0.87);\n  background-color: #242424;\n\n  font-synthesis: none;\n  text-rendering: optimizeLegibility;\n  -webkit-font-smoothing: antialiased;\n  -moz-osx-font-smoothing: grayscale;\n}\n\na {\n  font-weight: 500;\n  color: #646cff;\n  text-decoration: inherit;\n}\na:hover {\n  color: #535bf2;\n}\n\nbody {\n  margin: 0;\n  display: flex;\n  place-items: center;\n  min-width: 320px;\n  min-height: 100vh;\n}\n\nh1 {\n  font-size: 3.2em;\n  line-height: 1.1;\n}\n\nbutton {\n  border-radius: 8px;\n  border: 1px solid transparent;\n  padding: 0.6em 1.2em;\n  font-size: 1em;\n  font-weight: 500;\n  font-family: inherit;\n  background-color: #1a1a1a;\n  cursor: pointer;\n  transition: border-color 0.25s;\n}\nbutton:hover {\n  border-color: #646cff;\n}\nbutton:focus,\nbutton:focus-visible {\n  outline: 4px auto -webkit-focus-ring-color;\n}\n\n.card {\n  padding: 2em;\n}\n\n#app {\n  max-width: 1280px;\n  margin: 0 auto;\n  padding: 2rem;\n  text-align: center;\n}\n\n@media (prefers-color-scheme: light) {\n  :root {\n    color: #213547;\n    background-color: #ffffff;\n  }\n  a:hover {\n    color: #747bff;\n  }\n  button {\n    background-color: #f9f9f9;\n  }\n}\n';
__vite__updateStyle(__vite__id, __vite__css);
import.meta.hot.accept();
import.meta.hot.prune(() => __vite__removeStyle(__vite__id));
- 对于 ts/js 文件, 除了 vite 本身的编译器处理外,还需要根据具体的前端框架(react / vite)等等进行执行定制化的钩子,以 @vitejs/plugin-vue 来说,对应的 vue 组建经过编译后产生的源文件如下:
- 其中 46 行开始 _sfc_main 部分到 59 行为 vite-vue 插件生成逻辑, 在本文中继续解读:
- 46 行之前是定义 _sfc_main component 并且定义源码中的代码组成(这里可以看到有 text label 以及 一个 input element, 其中 text label 与一个 css style 模型进一步关联)
- createRecord: 来自于 vue-core 工程,vue-core 中 hmr 维护了 vue 自己内部视角的模块视图, 对应的 rerender /reload 本质上也是 vue 框架本身提供的 render 能力,与 vite 不再相关
- 可以看出,在 vue 模块模式下,vite 提供了 meta.hot.accept 对应的热更新边界管理, 热更信号本身则是被 vue 框架接受,由 vue 框架自身决定如何对热更相关的模块进行 render.
import { createHotContext as __vite__createHotContext } from '/@vite/client';
import.meta.hot = __vite__createHotContext('/src/components/FooComponent.vue');
import { defineComponent as _defineComponent } from '/node_modules/.vite/deps/vue.js?v=763c69f2';
import { ref } from '/node_modules/.vite/deps/vue.js?v=763c69f2';
import '/src/styles/FooComponent.css';
const _sfc_main = /* @__PURE__ */ _defineComponent({
	__name: 'FooComponent',
	setup(__props, { expose: __expose }) {
		__expose();
		const item = ref('Edit');
		const __returned__ = { item };
		Object.defineProperty(__returned__, '__isScriptSetup', {
			enumerable: false,
			value: true
		});
		return __returned__;
	}
});
import {
	toDisplayString as _toDisplayString,
	createElementVNode as _createElementVNode,
	vModelText as _vModelText,
	withDirectives as _withDirectives,
	Fragment as _Fragment,
	openBlock as _openBlock,
	createElementBlock as _createElementBlock
} from '/node_modules/.vite/deps/vue.js?v=763c69f2';
const _hoisted_1 = { class: 'read-the-docs' };
function _sfc_render(_ctx, _cache, $props, $setup, $data, $options) {
	return (
		_openBlock(),
		_createElementBlock(
			_Fragment,
			null,
			[
				_createElementVNode(
					'p',
					_hoisted_1,
					_toDisplayString('content : ' + $setup.item),
					1
					/* TEXT */
				),
				_withDirectives(
					_createElementVNode(
						'input',
						{
							class: 'input',
							type: 'text',
							'onUpdate:modelValue':
								_cache[0] || (_cache[0] = ($event) => ($setup.item = $event))
						},
						null,
						512
						/* NEED_PATCH */
					),
					[[_vModelText, $setup.item]]
				)
			],
			64
			/* STABLE_FRAGMENT */
		)
	);
}
_sfc_main.__hmrId = '8d1f73c4';
typeof __VUE_HMR_RUNTIME__ !== 'undefined' &&
	__VUE_HMR_RUNTIME__.createRecord(_sfc_main.__hmrId, _sfc_main);
import.meta.hot.accept((mod) => {
	if (!mod) return;
	const { default: updated, _rerender_only } = mod;
	if (_rerender_only) {
		__VUE_HMR_RUNTIME__.rerender(updated.__hmrId, updated.render);
	} else {
		__VUE_HMR_RUNTIME__.reload(updated.__hmrId, updated);
	}
});
import _export_sfc from '/@id/__x00__plugin-vue:export-helper';
export default /* @__PURE__ */ _export_sfc(_sfc_main, [
	['render', _sfc_render],
	['__file', '.../src/components/FooComponent.vue']
]);

//# sourceMappingURL=data:application/json;base64,...